This is default featured slide 1 title

Go to Blogger edit html and find these sentences.Now replace these sentences with your own descriptions.

This is default featured slide 2 title

Go to Blogger edit html and find these sentences.Now replace these sentences with your own descriptions.

This is default featured slide 3 title

Go to Blogger edit html and find these sentences.Now replace these sentences with your own descriptions.

This is default featured slide 4 title

Go to Blogger edit html and find these sentences.Now replace these sentences with your own descriptions.

This is default featured slide 5 title

Go to Blogger edit html and find these sentences.Now replace these sentences with your own descriptions.

Tampilkan postingan dengan label Tips Komputer. Tampilkan semua postingan

Kamis, 15 November 2012

Maen Hosting simple dengan Filezilla

hi kawan smua,,lama nih ana ndak posting nih grub,,sedikit da pencerahan,,akhirnya gua urusin lagi nih blog,,,
hhahah,,:)
kali ini ane coba sharing cara hostingan dengan filezilla
da yang blom tau tentang hosting ??? haio ngaku sapa yg blom tau?
hahha,,eya" ntar tak postingin agy apa yg nama e Hosting itu,,,hheh
ni ane kasih tau dulu gmna caranya pasang Filezilla di PC ato Laptop agan",,,


  1. Download dan install Filezilla Client. Bisa didownload melalui situsnya http://filezilla-project.org/download/.php
  2. Kemudian double klik Filezilla Client yang sudah didownload
  3. Kemudian akan muncul kotak dialog seperti berikut, klik I Agree
  4.  Pilih Anyone who uses this computer (all users), next
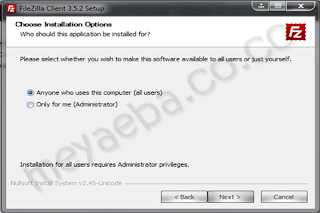
  5.  Centang Dekstop Icon jika ingin menampilkan icon Filezilla di desktop, next
  6.  Klik next sampai muncul kotak dialog di bawah ini, jika sudah muncul seperti ini, proses install selesai  

nah,,kalo semuanya udah sama kayag di atas,,sukses dah instalnya,,gampang kan...
sekian dulu dah dari ane,,,ntar ane pasti posting agy tentang Hostingan,,ok

Minggu, 02 Januari 2011

Cara mempercepat Mozilla

NB : Bagi yang kurang jelas masalah editnya, mending ug usah, dari pada suloyo
Nih caranya:
1. Untuk mempercepat browsing :
  1. Ctrl+Enter, ini untuk membuka domain yang menggunakan .com. caranya adalah ketikkan nama domain kemudian klik ctrl+enter. contohnya, anda ingin membuka “www.yahoo.com” jadi ketiklah “yahoo” kemudian klik ctrl+enter
  2. Shift+Enter, ini untuk membuka domain yang menggunakan .net. caranya adalah ketikkan nama domain kemudian klik ctrl+enter. contohnya, anda ingin membuka “www.telkom.net” jadi ketiklah “telkom” kemudian klik shif+enter
  3. Ctrl+Shift+Enter, ini untuk membuka domain yang menggunakan .org. caranya adalah ketikkan nama domain kemudian klik ctrl+enter. contohnya, anda ingin membuka “www.dikti.org” jadi ketiklah “dikti” kemudian klik Ctrl+Shift+Enter
2. Tweeking Firefox :
  1. Ketik “about:config” di firefox anda kemudian enter
  2. Maka akan keluar sebuah settingan untuk tweaking firefox
  3. Untuk merubahnya, klik 2 kali dan masukkan data perubahannya
  4. Jika data dibawah tidak terdapat dalam settingan default firefox, klik kanan pilih New. Untuk data berupa angka, pilih Integer, untuk true/false pilih Boolean.
- Untuk pengguna DSL :
  1. Set “network.http.pipelining : true”
  2. Set “network.http.proxy.pipelining : true”
  3. Set “network.http.pipelining.maxrequests : 64″
  4. Set “nglayout.initialpaint.delay : 0″
- Untuk pengguna ADSL :
  1. Set “network.http.max-connections : 64″
  2. Set “network.http.max-connections-per-server : 21″
  3. Set “network.http.max-persistent-connections-per-server : 8″
  4. Set “network.http.pipelining : true”
  5. Set “network.http.pipelining.maxrequests : 100″
  6. Set “network.http.proxy.pipelining : true”
  7. Set “nglayout.initialpaint.delay : 0″
- Untuk pengguna Dial Up
  1. Set “browser.cache.disk_cache_ssl : true”
  2. Set “browser.xul.error_pages.enabled : true”
  3. Set “network.http.max-connections : 32″
  4. Set “network.http.max-connections-per-server : 8″
  5. Set “network.http.max-persistent-connections-per-proxy : 8″
  6. Set “network.http.max-persistent-connections-per-server : 4″
  7. Set “network.http.pipelining : true”
  8. Set “network.http.pipelining.maxrequests : 8″
  9. Set “network.http.proxy.pipelining : true”
  10. Set “plugin.expose_full_path : true”
  11. Set “signed.applets.codebase_principal_support : true”
  12. Set “content.interrupt.parsing : true”
  13. Set “content.max.tokenizing.time : 3000000″
  14. Set “content.maxtextrun : 8191″
  15. Set “content.notify.backoffcount : 5″
  16. Set “content.notify.interval : 750000″
  17. Set “content.notify.ontimer : true”
  18. Set “content.switch.threshold : 750000″ 
Silahkan mencoba, n yang masih awam, tolong berhati-hati
Uke?